


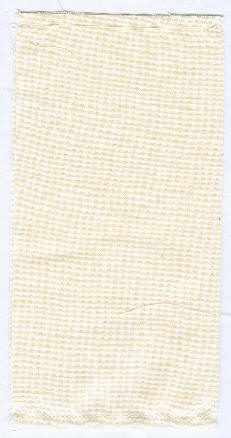
Material requirements
I use 100% cotton materials and thread.
A quilt 81 inches by 108 inches (queen size) requires 432 blocks 9.5 inches square of unbleached muslin. Twelve yards of 108 inch muslin yields about 450 blocks (if it has not been cut into smaller sections for easier handling). Also needed are 864 [822 full + 84 halves=864] squares of print fabric 2.5 inches square [nineteen quarter yards of print].
All materials are washed on regular cotton setting with detergent but no fabric softener. The material will warp and unravel a little, so overestimate the amount needed. It might be best to cut the 12 yards into 3 pieces so it Can warp itself out... as 1 piece it seems to remain a little 'twisted'... cutting into 9.5 inch sections prior to washing will not work as the edges unravel and the piece gets warped. Iron the piece(s) folded in half prior to cutting. I cut two layers at a time, more than 2 tends to get off set and I don't have the patience to do 1 at a time. I cut all the muslin into 9.5 wide sections, then cut all those into 9.5 inch squares.
[12+yards muslin, 19 (various) quarter (or third, to allow for warp and ravels) yards of print-decoration, 378 + inches of Edge seam binding, thread (~3 spools machine and ~3 hand quilting), Rotary cutter, cutting pad(s) (60 inch width for the long cuts), cutting edge-ruler guide (2@ 6x24, 1@ 6x12, taped together end to end for the initial long cuts), Iron and ironing board, washing machine, ...]
The muslin in the images appears to be yellowish burlap or a patterned material, it is NOT. On the other hand, the image of the finished quilt appears lighter than it is. These images are from a scanner and the depth shadows seem reversed... seams seem puckered UP... o well, and so it goes.

Construction
Step 1
Fold muslin (ecru) square in half and stitch ends using 1/4 inch seams and leaving an opening about 1.5 inches on one end. (See caution notes.) [I use the machine for every step except 6, 7, and 8.]
Step 2
Bring ends of end seams together and stitch [fold out the fabric to allow sewing the edges together, then refold-flatten the pentafore to make a square again]. This will yield a square of about six inches. Make several squares like this. (I make 144 at a time to produce a panel (of 3) that is six square wide by 24 squares long.)

Step 3
Trim seam ends and cut out some material at center point. Turn (inside out), using the opening left in one end. ( I use a point turner to make crisp points) I finger press seams in one direction at this time. Press the resulting square. I use sizing spray at this time. (See caution notes.)

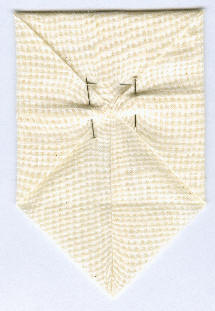
Step 4
Bring the four corner points to center and pin in place. Press again. This makes a crease stitch which will be used as a stitching line in joining blocks together. [The image below is seen already rotated, as what was square becomes a square turned 90 degrees.. the corner-point pointing down will be folded UP to meet the other corners..now center flaps.. these will be sewn down at the center meeting point (Step 6) after the blocks are sewn together (Step 5).]
Step 5
Stitch blocks together using crease lines as a guide. (See caution notes.) At this point you can decide how many squares you want to work with at one time. At any point this quilt can be finished by hand rather than using machine stitching. I use the machine for every step except 6, 7, and 8.
Step 6
Sew the corners of the squares together, forming a flat surface. As mentioned in Step 2, I sew in panel groups of 144 blocks. In the image below you can see 4 blocks sewn together, the seam between the 2 on the right and their sewn down corners. Note the mismatch of the corners in the lower right block... try to reduce these by keeping errors to a minimum, as they will accumulate and be hard to disguise.
Step 7
Pin a print square over all seams and stitch as shown, folding edges of ecru material over edges in a curved seam. Be careful to catch all thicknesses of material .
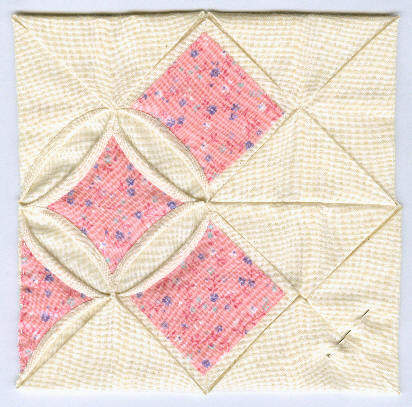
Note: this is 4 blocks, there becomes an Extra row of prints squares between the block rows. There is also an offset every other row. The top pink print is -between- the top 2 squares. The encircled print is -between- the left 2 squares. You can see the seam of the top and bottom (right) blocks in the area NOT YET covered by a print. There is a half print on the left edge of the bottom left block and a full print -between- the bottom 2 squares.
Not ALL edges get half prints... Only the ones designed to be the edge of the quilt. This block group will be joined to another block group, and the edge triangles will become full squares. As mentioned in Step 2, you decide how many blocks you can handle at a time... they will have to be joined together to form the full quilt.
Completing quilt
When quilt is complete edges may be finished by adding a half print square and seam binding. Edges may be finished by stitching the half block without the print or the binding.
Cautions
At Step 1: With quarter inch seams it is very important that seam edges are even. A Rotary cutter and cutting guides are used to make the squares square and the edges smooth Prior to any construction.
At Step 3: Be careful with the pressing since all edges are true bias and are easily stretched beyond use. (As shown by lower <> top corners of block between Step 3 and 4)
At Step 5: At seam joints try to keep seams even -that makes squares more true and makes the blocks easier to assemble. As shown by the lower right block in image above.
Although these cautions are numbered they apply to all steps... try to keep the squares square and things neat and tidy.

